In the beginning was the web, and the web was…ugly.
No one knows why, but it was indeed ugly. So in 1994, a web pioneer working at the birthplace of the web - CERN, named Håkon Wium Lie, has proposed a new way to style the web. This method of styling relies on a simple concept called cascading, which is a priority scheme that determines which style rule applies if more than one rule matches a particular element. Hence, the name Cascading Style Sheets or as self-taught developers lacking history lessons like myself would call it - CSS.
CSS went on to be a great success, adopted by major browsers and contributed greatly to the increment of insomnia rate among developers, making Håkon Wium Lie, one of the greatest creations that Norway has ever given to the world, just after Aurora and OOP of course. So, takk skal du ha herr Håkon Wium Lie for that.
Fun Fact: In 1996, Netscape implemented CSS support by translating CSS rules into snippets of JavaScript, which were then run along with other scripts. It’s certainly inefficient to use CSS that way, so Netscape then proposed a new syntax called JSSS or JavaScript Style Sheets to bypass CSS entirely.
That didn’t work out, fortunately. And from that on, the world lives happily in CSS and we never tried to write JS for styling ever again.
CSS Parsing

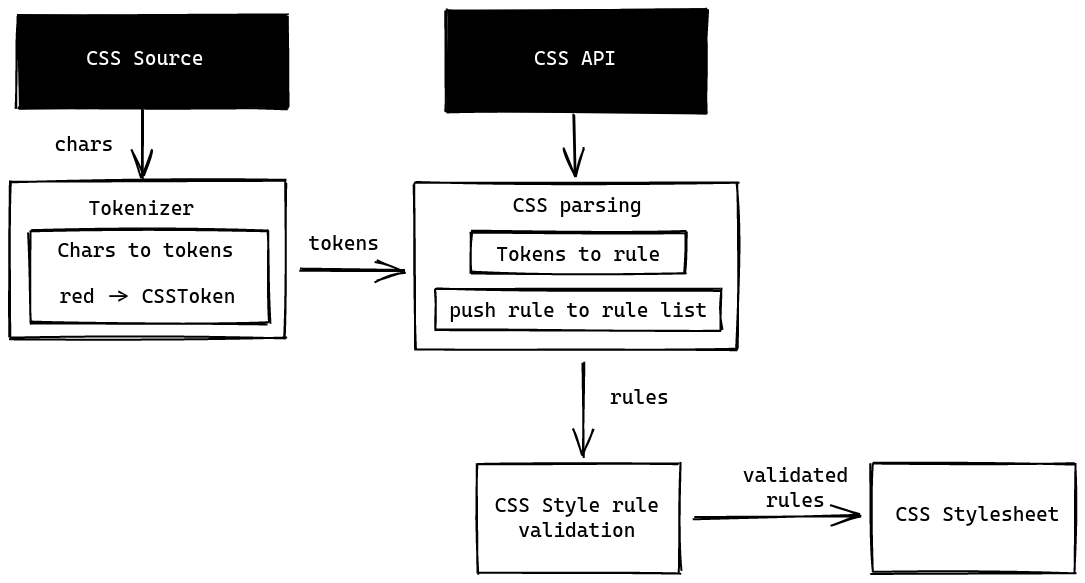
Similar to HTML parsing, CSS parsing also starts by tokenizing the CSS source code into tokens, which are then parsed into CSS rules.
The parsing rules are described in the CSS syntax spec. However, since the syntax is fairly simple, you are free implement your version of the parsing algorithm to maximize the speed. In fact, Tab Atkins Jr. who is working on the syntax spec states in his implementation of the spec:
This parser is not designed to be fast, but users tell me it’s actually rather speedy. (I suppose it’s faster than running a ton of regexes over a bunch of text!)
But what does he know right? In regex we trust
CSS rules
The result of the parsing process is a list of CSS rules. These rules come in 2 flavours:
- Style rules: Normal styling rules. For example:
div.cursed-btn {
  color: red;
}- At rules: Rules that are prefix with the
@character:
@import "style.css"For the sake of simplicity, and because I haven’t implemented at-rules support
yet, I will only be covering how browser process style rules.
Style rule parsing
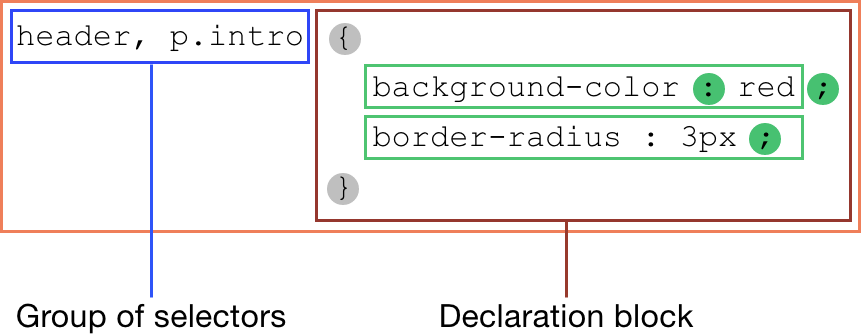
 To avoid expensive lawsuit in the future, here’s the
source of the diagram
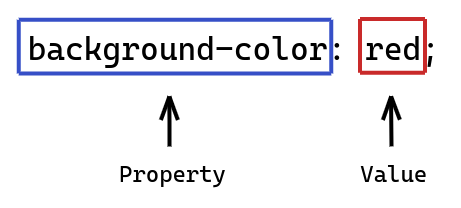
A valid style rule is a CSS rule that has a list of selectors and a declaration block. The declaration block contains many style declarations separated by semicolons.
Meaning…
.ಠ_ಠ { --(╯°□°)╯: ︵┻━┻; } is valid CSS.
— 🏝 Taudry Hepburn 🏝 (@tabatkins) February 22, 2019
Selector parsing
Much like when women going to the restroom, CSS selectors also often come in groups and are separated by commas.
One key thing to remember is the whole style rule is discarded if one of the selectors is invalid.
For example, in the code below, only the rule for the invalid selector h2..foo
is removed. Other style rules will still be applied normally.
h1 { font-family: sans-serif }
h2..foo { font-family: sans-serif } /* THIS RULE WILL BE DROPPED */
h3 { font-family: sans-serif }
However, in the example below, since the rule contains an invalid selector, the whole style rule is considered invalid and is discarded.
/* THIS WHOLE RULE WILL BE DROPPED */
h1, h2..foo, h3 { font-family: sans-serif }
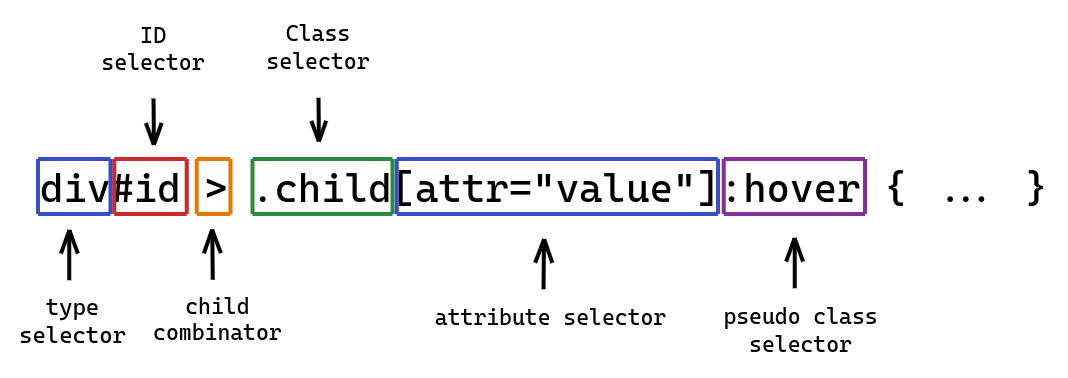
Each selector in the group is a chain of one or more sequences of simple selectors separated by combinators.
There’re 6 types of simple selectors:
/* Type selector */
h1 {
  color: red;
}

/* Universal selector */
* {
  color: red;
}

/* Attribute selector */
[attr="value"] {
  color: red;
}

/* Class selector */
.class {
  color: red;
}

/* ID selector */
#id {
  color: red;
}

/* Pseudo class selector */
:root {
  color: red;
}
And 4 types of combinators:
- Descendant combinator (
' ') - Child combinator (
'>') - Next-sibling combinator (
'+') - Subsequent-sibling combinator (
'~')
And they are usually combined into somthing like this:

But if you are a web developer like me, you probably have already known what CSS selectors are all about. So here’s the spec if you want to dive deeper, and let’s move on to something more exciting.
CSS style processing
Selector matching
After parsing all CSS rules, the browser must then perform a process called selector matching, which is like tinder, but for style rules and DOM nodes.
In this process, the browser will attempt to match the selector of every style rule to every node in the DOM tree. If a node prefers no ons and fwb and matched the selector, all the style declarations in the style rule will be applied to that node.
If you are thinking: “This sounds incredibly inefficient! What if I intentionally write a very weird selector to slow down the web?” then the answer is: “you will burn in hell, you prick.”
But not to worry, browser engines nowadays are very smart and do all kinds of optimization so prevent that from happening. So if you feel lost in life and wish to learn more, I suggest you dive into this link.
Style declaration processing

Property processing
There are 2 types of CSS property:
- Longhand: Individual style properties, such as
color,padding-left, etc. - Shorthand: Used to expand and set values to corresponding longhand
properties. For example, the value of the
borderproperty (shorthand) is separated and distributed to 3 other longhand properties which areborder-color,border-width,border-style.
So when the browser encounters a shorthand property, it “expands” that into multiple longhand properties and apply them accordingly.
Value processing
For every property of every element on our page, the browser guarantees there is always a value for it. Even if there is no style declaration applied, the browser will still fall back to a value via the defaulting process. We will discuss that later.
As of 2021, there are 538 different CSS properties. Therefore, to render a page, every element on the page must have a style object that holds 538 properties, each with its own value.
So to optimize the space usage, properties that share a common value, will hold a pointer to that value instead of owning a copy of the value for themselves, which is similar to the concept of “interning” in Python:
Now, to ensure every property has a value, the browser must performs a multi-step calculation to process style rules and arrive at a value for each property.
Notice me senpai! I won’t be going deep into the details of each step, but if you wish to learn more, consider reading the spec.
Step 1: Collect declared values
Declared values are values that you declared in style declarations.
So if we have an element like this:
<div id="box"></div>and a list style rules like this:
div {
  color: red;
}

#box {
  color: blue;
}
The browser will collect both of the values red and blue for the color
property. These values are called declared values.
Step 2: Find the cascaded value
To decide if red or blue will be used, the browser runs an algorithm called
“cascading” to find the winning value.
The cascading process sorts the list of the declared values in descending order. The value that comes first will be the winning value and will take on the new name-cascaded value.
The criteria for sorting are as follow:
Origin and importance
If a value is declared with !important, it will have a higher priority and
more likely to be used. Otherwise, the value will be sorted by the origin of the
style rule.
There are 3 core origins:
-
User-agent origin: Styles that come from the default style of the browser. Reset.css or normalize.css was created to override these style rules.
-
Author origin: Styles that come directly from the HTML document, either inline, embedded or linked externally.
-
User origin: Styles that come from the user. These may be from adding styles using a developer tool or from a browser extension that automatically applies custom styles to content.
The ordering for sorting in this step is:
- Important user agent declarations
- Important user declarations
- Important author declarations
- Normal author declarations
- Normal user declarations
- Normal user agent declarations
Declarations from origins earlier in this list win over declarations from later origins.
Specificity
If the previous step results in an equal order, the browser will then sort by the selector specificity. The more specific the selector is, the more likely the value will be used.
This can come in handy if you want to stop spamming !important so you can, you
know…actually understand your code and shit.
Order of appearance
If all else fails, the value which comes last wins. For example:
.box {
  color: red;
  color: blue; /* THIS WILL WIN */
}
Take that! Ms. high school teacher who told me I won’t have a future if I come late.
Step 3: Find the specified value
Because the cascaded value is the winning declared value, if a property doesn’t have a declared value, there will be no cascaded value to process further.
This step makes sure every property has a value by performing a “defaulting” process to fall back to a default value for that property. The resulting value will be called the specified value.
Defaulting process
If a property is inheritable, the defaulting process will result in the value
inherited from the parent. This is why when you specify the color property for
an element, all child elements inside of it will inherit the same color value.
Otherwise, the browser will use the initial value of the property, which you can find a list of them here.
Step 4: Find the computed value
At this point, every property of every element should have a value. However, before the browser can use the value for rendering, it will have to compute the specified value into the computed value.
Computing means absolutizing the specified value. So if you have a specified
value that has a relative unit, such as vh, vw, etc, it will be “computed”
into a pixel value.
For example:
| Specified value | Computed value |
|---|---|
| 100vh | viewport height in px |
../view.jpg | absolute URL to view.jpg |
Step 5: Find the used value
Used value is just computed value with more “computing”. However, this step
is calculated after the layout process so the browser can determine some values
that require the page layout. For example, if you have a width: auto, the
value auto will be resolved into a pixel value at the step after knowing the
page layout.
Step 6: Find the actual value
While it’s OK to use the used value for rendering, some browsers will have to
adjust the used value into something that the browser can support. For example,
a browser may only be able to render border-width with integer pixel. So if
the used value is 4.2px, the actual value will be 4px instead.
And that is how a browser process a value from CSS source code to rendering.
When I was younger, my teacher told me to always write a conclusion or ending for my essay. But I was never a good writer, so I often use one formula for every ending and still get a high score. So here we go:
I hope you have learned something new after reading my post. I promise to make it less boring next time to not disappointing my readers, my parents, and I’ll try my best to become a functioning member of society.
Cheers.
Resources
- Bert Bos. 2016. A brief history of CSS until 2016
- W3C. 2020. CSS Syntax Module Level 3
- W3C. 2020. Selectors Level 3
- W3C. 2020. CSS Cascading and Inheritance Level 3
